|
Untitled Page
ARCHIVED FORUM -- April 2007 to March 2012
READ ONLY FORUM
This is the first Archived Forum which was active between 17th April 2007 and
1st March February 2012
Latest post 10-25-2009 10:03 PM by MAKEDONIA. 141 replies.
-
-
 Dillen
  - Joined on 02-14-2007
- Copenhagen / Denmark
- Posts 5,008

|
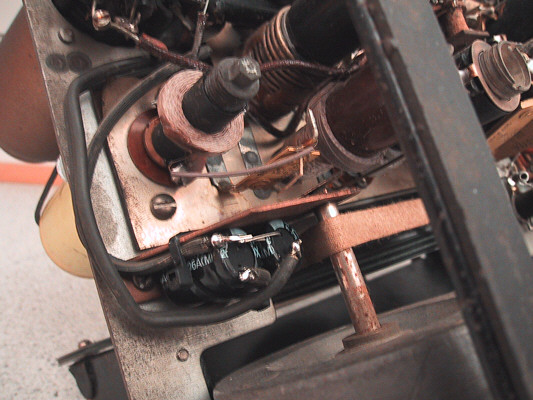
Now, two new 22uF 400V electrolytic capacitors have been hidden away below decks.
I found a nice "isolated" spot where they could be fitted, held by a cable strap,
and their leads wired to where the original caps leads went. I used the heat
resistant lead for this since it looks pretty much like the original leads
and it will withstand the heat buildup around the large CCH2 tuner valve.
It makes for a tidy chassis and is completely reversible so in thread with the plan.
Martin
|
|
-
-
Craig

 - Joined on 03-29-2007
- Costa Del St Evenage
- Posts 4,855
|
 Dillen: Dillen:
sadly 1Mohm potentiometers
with a built-in push-pull mains switch are no longer off-the-shelf parts
Martin, is there any way of changing the resistance of the potentiometer? For example could you find one that had the built in switch but a different resistence? My reason for asking was I was odering some parts at work today from one of our suppliers, I thought of this thread and started to see what they had. Came up with this, not sure if it would be any good though.
Craig
For millions of years, mankind lived just like the animals. Then
something happened which unleashed the power of our imagination. We
learned to talk and we learned to listen..
|
|
-
-
Dillen
- Joined on 02-14-2007
- Copenhagen / Denmark
- Posts 5,008
|
Craig, 1000 thanks for the thought and your time, greatly appreciated !  The potentiometer forms part of the tonecontrol in a pretty comprehensive
circuit so I would prefer to get the correct value.
Besides, the ones listed there seems to have the rotary type of switch and
to stay as close to the original as possible I would prefer it to
be a push-pull type. Asking a lot, I know but it may not be impossible.
I think, I found something useful in Sweden to solve this
little problem, fingers crossed. Martin
|
|
-
-
Medogsfat

- Joined on 02-21-2007
- *Moderator* Leeds, Yorkshire
- Posts 4,045
|
Martin, if you can find anything on the Farnell site just let me know and I'll send it to you. Chris.
The use of metaphors should be avoided like the plague. They're like a red rag to a bull to me.
|
|
-
-
PWH
  - Joined on 06-22-2008
- Posts 44

|
Dillen wrote> Leaning more and more towards the theory of the yellow cap being the original, I
will remove the added un-original cap and leave the original cap in
situ for appearance. Obviously you can check against your own set, but it does not look right to me. Some caps have the date marked on them in full or week No and year 52/47 for instance. Most of them are also the other way up, i.e wires below deck!
|
|
-
-
Craig
- Joined on 03-29-2007
- Costa Del St Evenage
- Posts 4,855
|
Dillen:
Craig,
1000 thanks for the thought and your time, greatly appreciated ! 
The potentiometer forms part of the tonecontrol in a pretty comprehensive
circuit so I would prefer to get the correct value.
Besides, the ones listed there seems to have the rotary type of switch and
to stay as close to the original as possible I would prefer it to
be a push-pull type.
Asking a lot, I know but it may not be impossible.
I think, I found something useful in Sweden to solve this
little problem, fingers crossed.
Martin
No problem, it was better than doing work.
Craig
For millions of years, mankind lived just like the animals. Then
something happened which unleashed the power of our imagination. We
learned to talk and we learned to listen..
|
|
-
-
Dillen
- Joined on 02-14-2007
- Copenhagen / Denmark
- Posts 5,008
|
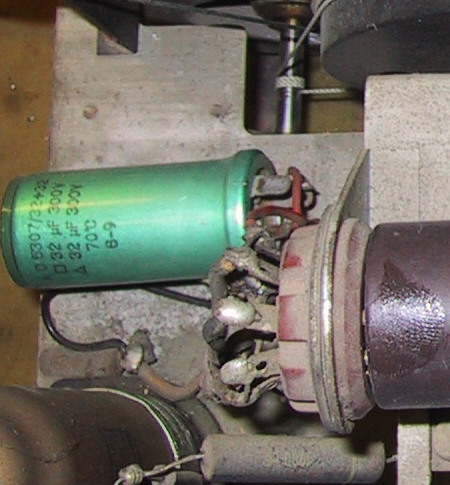
I know what you mean, Craig
I agree that the yellow cap looks a bit too new for this set, that
was also my initial thought, but it's the same brand as the
wax/paper capacitors found elsewhere in the set, namely Super Electric,
a long gone danish component producer.
The yellow capacitor has no date code. I am not sure if date coding was
introduced at all this early.
The screws holding it's clamp to the chassis is of the same type as
what is used elsewhere in the set.
In my own set, the capacitor is mounted vertically rather than
horizontally and it's mounting is not "very convincing".
It's green and has no brand logos.
Furthermore it's a 2x 32uF 300V cap so not as described in the schematics
and actually a bit underdimensioned voltage-vise.
I believe this one is not original and the numbers "5307" printed
on it could confirm that it was probably replaced some 50 years ago.
Thanks for your very kind offer, Chris. I will definitely keep it in
mind and I just might take you up on it.
Martin
|
|
-
-
Friedmett
 
- Joined on 04-28-2007
- Herning, Denmark
- Posts 840
|
How is it going with this? Any updates on parts or are you stuck somewhere in the process? I know you that you never give up so I rule that out.
|
|
-
-
rayfenwick

- Joined on 04-28-2007
- Hull UK (again)
- Posts 693
|
I think there's a fair few of us following this thread with great interest. 
Ray
Я люблю Банг и Oлуфсен
|
|
-
-
Dillen
- Joined on 02-14-2007
- Copenhagen / Denmark
- Posts 5,008
|
Thanks guys, very encouraging to know.
The thread has been standing still for some time due to my travelling around a bit.
Work hasn't stopped though and there are still a lot of issues to attend like
f.e. the mains cord;
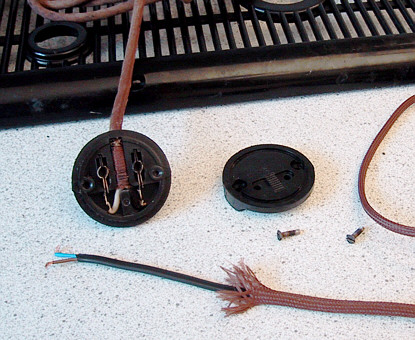
The original mains cord for this set is no longer fit for fight.
It's a braided 2-core with rubber insulation. The rubber has crumbled, exposing
the copper leads here and there and makes a crunching sound when
rolled between fingers. A new mains cord will have to be made.
Luckily, I found some fresh 2-core mains lead of the new type with PVC sheathing
and braided in a color similar to that of the original.
I bought this lead, readily braided and all from fellow Beoworld'er PWH and
it will suit this project perfectly. I couldn't have wished for a better
solution than this.
Martin
|
|
-
-
Dillen
- Joined on 02-14-2007
- Copenhagen / Denmark
- Posts 5,008
|
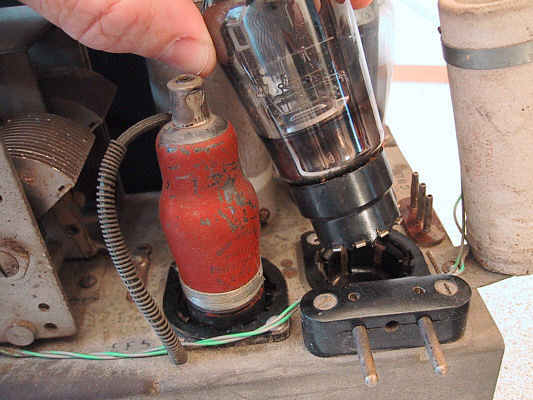
The valves pins (side contacts in this case) was cleaned using a glass-hair brush
to remove any oxidation, dust and dirt. Also the sockets were cleaned using
cotton buds and isopropanol. Try to avoid getting isopropanol on the bakelite
of the sockets and bases, not all types of bakelite like it and it may even turn
the bakelite slightly conductive.
When unplugging valves from their sockets you need to be gentle.
Needless to say, you should never pull a valve by its glass envelope.
Always try to grab the valves base, lift straight up and avoid wiggling
the valve from side to side.
Sounds very easy but not always so in real life.
It can sometimes be hard to just grab around the valve base and pull, the
valve will often stick and bind to the socket and there won't always be enough
room around the valve for your fingers.
Besides, somehow it lies in our nature to wiggle things to ease them apart.
In most cases, wiggling will indeed losen things and get even stubborn plugs
undone but in the case of valves, there's a risk that the glass envelope
will work lose from the base, maybe even breaking the thin leads that
goes from the glass to the inside of the socket, connecting to the socket pins.
You could also damage the socket itself or its contacts.
In this case, the sockets are bakelite, other sets can have ceramic or paxolin
sockets, depending on the age and build quality of the particular set.
The rectifier valve (CY2 in this set) has a lose base. I noticed it moved
a bit when I turned the chassis upside down and it was gently unplugged by
gripping only the socket and pulling straight up.
The original glue seems to be a nice mix of some solvent-based adhesive and
some filler material, wood-flour or similar.
In some cases, the valve can be rescued by dripping a strong solvent
like f.e. acetone down the crack between the glass envelope and the base.
Let it soak for a while, repeat it a couple of times to compensate for the amount
that evaporates and finally press the glass envelope down and arrange something
to hold it there overnight, f.e. a large rubber band going over the top
of the valve and between the pins of its base.
In this case, it seems this trick worked. The CY2 valve is now again firm to
handle and will hopefully still work.
Martin
|
|
-
-
Dillen
- Joined on 02-14-2007
- Copenhagen / Denmark
- Posts 5,008
|
Capacitors.
This could easily be a very long chapter. Capacitors is an issue in this set as
well as any other set 20 years of age or more.
We've already looked at the mains smoothing and filter cap(s) so I will
merely name a couple of other types;
Of non-electrolytic caps, the wax paper is the worst type.
I've still to see a wax paper cap that wasn't leaky or at least way off specs.
I probably won't ever see a good one.
The Beolit 39 has a couple of caps of this type and we will have to deal
with them later.
Valve sets are generally not very critical on component values and it's quite
common for caps in valve sets to have tolerances of +/- 20, sometimes even 50%.
However, in some positions the capacitor itself can be a safety issue rather
than a mere cause for erratic functionality.
The antenna connector circuit is a good example.
It looks a friendly and pieceful place for a cap but it's actually one of the
most important places for the service man to check.
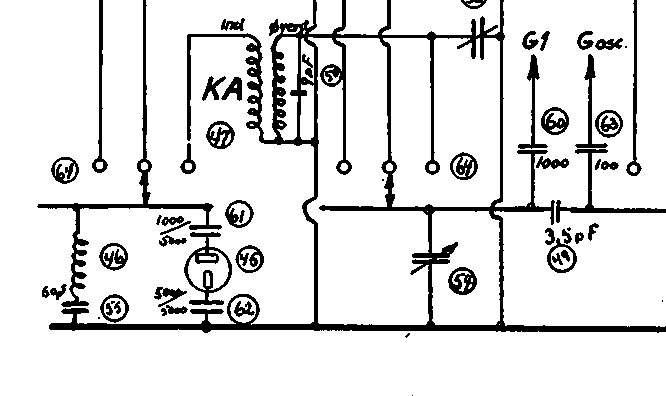
Looking at the schematics, the antenna connector (45) has two pins;
One is a grounding pin and the other is the antenna.
Remember the good old days where one lead went to the radiator, the water pipe
or some other metal object that could provide a good ground base ?
The lower pin in the schematics is the grounding pin, but hey what's that,
it's not connected directly to the sets chassis and there's a good reason for this.
Martin
|
|
-
-
Dillen
- Joined on 02-14-2007
- Copenhagen / Denmark
- Posts 5,008
|
As already mentioned a couple of times, this sets chassis can potentially
be the bearer of live mains so having one of the antenna leads carry live mains
would make for a lethal hazard. Especially, since this is the pin you will be
connecting to the water pipe. You wouldn't want to hold both, let alone connect them.
Clever enough then to put a capacitor in series with this lead.
The capacitor, 5000pF in this set, will easily be large enough to conduct
the high frequency antenna signal but small enough to block out the mains.
But what happens if this cap starts to become leaky i.e. starts to act as a
resistor, conducting current ?
Well, we will potentially, namely depending on the way the mains plug
is inserted into the wall outlet, have live mains on the lead.
Ohms law put into action gives us that even the smallest current will bring us
the high voltage - on the antenna ground lead - the one you will be connecting
to the water pipe.
This will effectively be directly across mains or at least from live to ground.
I would prefer not to set up those antenna leads, even in a house
with safety cut-off relays. It will, if not kill you, then at least make for
a terrific and unpleasant surprise.
Martin
|
|
-
-
Dillen
- Joined on 02-14-2007
- Copenhagen / Denmark
- Posts 5,008
|
I've seen sets where this capacitor has blown itself to pieces.
The schematics gives the voltage rating of this cap as 5000 volts, and that's
clearly not made so just for the fun of doing it even if the 200-250 V voltage
clearly isn't what kills the capacitor.
The problem comes when the capacitor starts to leak, acting as a resistor.
Ohms law is not going easy on this component, that's for sure.
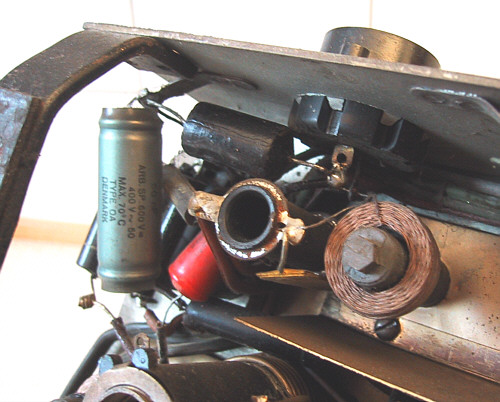
Any wax paper - or electrolytic capacitors found here should be replaced with
a modern class Y capacitor for safety reasons. No exceptions.
Needless to say, this also goes for the mains suppressor capacitor that is found
across the mains, directly after the mains switch.
In this set, both of these capacitors are of a type that radio
restorers refer to as "Black beauties".
A black beauty is a black cylindrical component, looks like it was dipped
in tar or some kind of hard wax and usually with some white - or yellow'ish
lettering that has more or less fallen off and more often than not
the housing has dried out and cracked.
Being only slightly better than the wax paper type, which doesn't really give
any good reference, I like to replace black beauties on sight.
This particular cap has a mark on the opposite side that looks like it was
touched by a hot soldering iron by a previous repairer so that gives us
two good reasons for replacing it.
Because of it's position, directly across mains, a modern Class X or X2 component is
called for. This is not a place to slacken on safety.
Martin
|
|
-
-
Craig
- Joined on 03-29-2007
- Costa Del St Evenage
- Posts 4,855
|
Nice to see the work on this beauty in continuing. Craig
For millions of years, mankind lived just like the animals. Then
something happened which unleashed the power of our imagination. We
learned to talk and we learned to listen..
|
|
-
-
-
beocool
 - Joined on 10-17-2007
- the Netherlands
- Posts 5,514

|
Yes, great to see this, Martin! And by the way, a good idea, Andy. 
Beoworld's twenty-eighth ninth prize winner and fifty-first second prize winner. Best £30 I've ever spent!
|
|
-
-
Dillen
- Joined on 02-14-2007
- Copenhagen / Denmark
- Posts 5,008
|
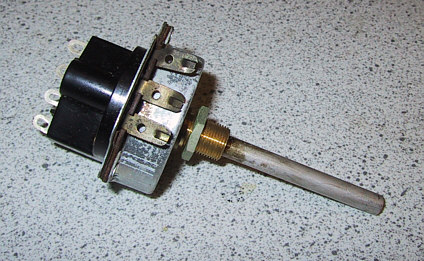
I've managed to find a NOS (New Old Stock) potentiometer for use as
the volume control and mains power switch.
Physically it's not exactly like the original but it's of the correct
ohmic value, has the correct shaft diameter and has a built-in power
switch of the push-pull type so it will be a perfect part for the job.
Always wonderful to find that someone decided to keep old parts rather than
throw them away.
Martin
|
|
-
-
Craig
- Joined on 03-29-2007
- Costa Del St Evenage
- Posts 4,855
|
Dillen:
I've managed to find a NOS (New Old Stock) potentiometer for use as
the volume control and mains power switch.
Physically it's not exactly like the original but it's of the correct
ohmic value, has the correct shaft diameter and has a built-in power
switch of the push-pull type so it will be a perfect part for the job.
Always wonderful to find that someone decided to keep old parts rather than
throw them away.
Martin
Fantastic Martin, I wondered if you would find one of these.
Craig
For millions of years, mankind lived just like the animals. Then
something happened which unleashed the power of our imagination. We
learned to talk and we learned to listen..
|
|
-
-
Friedmett
- Joined on 04-28-2007
- Herning, Denmark
- Posts 840
|
Craig: Dillen:
I've managed to find a NOS (New Old Stock) potentiometer for use as
the volume control and mains power switch.
Physically it's not exactly like the original but it's of the correct
ohmic value, has the correct shaft diameter and has a built-in power
switch of the push-pull type so it will be a perfect part for the job.
Always wonderful to find that someone decided to keep old parts rather than
throw them away.
Martin
Fantastic Martin, I wondered if you would find one of these.
Craig
Great to hear and see. I never wondered. This beauty of a radio will be back in great order. Just wait and hear.
|
|
-
-
Dillen
- Joined on 02-14-2007
- Copenhagen / Denmark
- Posts 5,008
|
The "new" potentiometer has a long shaft but not quite long enough so
I had to figure out a way to extend it.
Actually, I will have to shorten the shaft of the new potentiometer or
the extension joint will be right where the shaft protrudes through the
hole in the bakelite cabinet and there's not too much room.
A cheap modern potentiometer of an odd value offered its plastic shaft.
It was simply sawn off using a fine-tooth metal saw blade.
The exact length was measured and the new potentiometer shaft sawn off
to match.
The ends to be joined were then filed rough at the sides and little
slots were sawn into the sides to help the araldite grip the shafts.
The pieces were glue together with a piece of plastic tubing as support
for the joint. The result is a very good and solid joint that will transfer
the forces of rotation as well as pushing/pulling the switch.
Extending the potentiometer shaft this way gives us an extra bonus in that
it provides us with a solution to another safety issue;
Problem is that the potentiometer shaft, which is metal, is directly
in touch with the potentiometer housing and again to the sets chassis,
meaning that it can potentially hold live mains.
The grub screws used to hold the isolated knobs on AC/DC sets are often
covered with wax or at least sat very deep so they cannot be touched for the
same reason.
Pulling the volume knob outwards to switch on the set, bares a length of the
potentiometer shaft. Not a lot but some 4-5 millimeters, just enough for a
childs finger to grab and reach behind the knob and touch the metal shaft.
With the extension made of plastic this is no longer an issue.
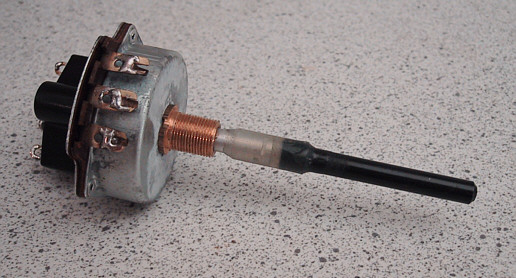
Martin
|
|
-
-
Craig
- Joined on 03-29-2007
- Costa Del St Evenage
- Posts 4,855
|
Nice job Martin, looks very good. Craig
For millions of years, mankind lived just like the animals. Then
something happened which unleashed the power of our imagination. We
learned to talk and we learned to listen..
|
|
-
-
j0hnbarker
  - Joined on 04-16-2007
- LS28/GB
- Posts 2,002

|
Craig:
Nice job Martin, looks very good.
Craig
Yep - super-neat. Great job :)
President, Beomaster 8000 Appreciation Society
|
|
-
-
-
rayfenwick
- Joined on 04-28-2007
- Hull UK (again)
- Posts 693
|
Yes indeed, a great job and a great thread. Loving it!
Ray
Я люблю Банг и Oлуфсен
|
|
|
|
|