|
Untitled Page
ARCHIVED FORUM -- April 2007 to March 2012
READ ONLY FORUM
This is the first Archived Forum which was active between 17th April 2007 and
1st March February 2012
Latest post 10-25-2009 10:03 PM by MAKEDONIA. 141 replies.
-
-
 PWH
PWH
  - Joined on 06-22-2008
- Posts 44

|
Hi Dillen, That 'little fellow' is renowned for frying transformers leaving the primary open circuit and destroying output valves for the reason you mention. I always replace it with at least 2x max voltage working of the previous valve's HT voltage to protect it, what voltage rating is the 'little fellow'?
|
|
-
-
Dillen
  - Joined on 02-14-2007
- Copenhagen / Denmark
- Posts 5,008

|
I believe its a 400V capacitor so should be fine. Did you experience problems with these mustard colored caps ? Martin
|
|
-
-
PWH
- Joined on 06-22-2008
- Posts 44
|
I have never had a problem with these yet provided they are the correct rating for the job. They are available in various voltage ratings notably 160V & 400V they are all marked -160 is too low! Measure the DC voltage between chassis & the grid of the Output valve- should be negative. I expect the value is on the schematic Regards
|
|
-
-
Dillen
- Joined on 02-14-2007
- Copenhagen / Denmark
- Posts 5,008
|
Yep, it's a 4700pF 400V component.
I double-checked it and it is absolutely fine. I also checked the output transformer and here the result was
somewhat different to say the least;
The service sheet gives the DC ohmic values as 380 / 0.8 ohms.
The actual transformer measures 11K / 0.8 ohms - the 11 Kohms
is far too high so this transformers primary has had it. No doubt this
is the cause for the fairly low volume output. So now I am on the lookout for an output transformer.
The service sheet gives the anode current as 33mA.
The original transformer is a Peerless CL4 and would probably
prove hard to find but a good replacement with apprx the same
values will be just as fine. Martin
|
|
-
-
PWH
- Joined on 06-22-2008
- Posts 44
|
Off to the car boot sales then (if you have them in Denmark ) ) Philips Radios used CBL1's a lot so they will have a matching transformer provided it is the right physical size. If you have no luck let me know and i'll see what I have here. Have you tried re soldering the tags? sometimes they get 'green spot' and the flux eats the copper wire Failing that I have some contacts who can rewind transformers -at a price.
|
|
-
-
Medogsfat

 - Joined on 02-21-2007
- *Moderator* Leeds, Yorkshire
- Posts 4,045
|
 Dillen: Dillen: So now I am on the lookout for an output transformer.
The service sheet gives the anode current as 33mA.
The original transformer is a Peerless CL4 and would probably
prove hard to find but a good replacement with apprx the same
values will be just as fine. Martin
Which will be collected this evening and shipped to Denmark ASAP Chris.
The use of metaphors should be avoided like the plague. They're like a red rag to a bull to me.
|
|
-
-
-
bayerische
  - Joined on 12-11-2007
- Helsinki, Finland
- Posts 3,593

|
-Andreas
BLab5, BLab5000, BLab8000, BV10, BS9000, BS3, Beo5, Beo4, BLink1000, BLink5000, BLink7000, A2, A8, Form2
|
|
-
-
dj01fad
- Joined on 01-08-2009
- Posts 10
|
wow incerdible, I'm out of words... this is a wonderfull topic, and a wonderfull job. by the way, the beolit 39 radio is priceless... I can't wait to see it done.
|
|
-
-
Dillen
- Joined on 02-14-2007
- Copenhagen / Denmark
- Posts 5,008
|
Thanks to Chris (Medogsfat) who very kindly helped me to a new output transformer.
Your help is greatly appreciated ! With this part, I will hopefully be able to get the output stage working as
it should.
The original transformer was scrutinized but no obvious faults could be seen,
the way too high primary DC resistance however, proved that it was indeed defective. The new transformer is a brand new general purpose component. It has several
tappings on both primary and secondary and will be easy to fit inside the
speaker cloth bag. The best suitable tappings were selected and the speaker wires attached accordingly.
The transformer was then fitted using the original mounting holes in the
speaker metal basket. Power up.
Hmmm... the new transformer didn't provide the significant change in output volume
that I was hoping for.
It did, however, set the voltages around the output valve, particularly the anode
voltage, correct. Martin
|
|
-
-
Dillen
- Joined on 02-14-2007
- Copenhagen / Denmark
- Posts 5,008
|
Without a working sample and no immediate experience with servicing this particular
set, it's a bit hard to tell what to consider normal and what to expect.
However, I would think that for a normal listening volume, the volume control would
have to be somewhere around its center position so even if this is merely a 3-valve
construction (not counting the rectifier), it still left a bit to be desired.
Besides, the AGC was still not active which also confirmed that not all was well yet. Next, my attention was turned towards the frontend valve.
The CCH2, of which I now have three, would be the next thing to check.
Swapping between the three valves left me with two working valves, one slightly
better than the other in the form of more stations received, and one completely
dead valve.
The best valve being the one that came to me with the set. Check valve voltages.
The heater voltage was low - what is going on here ?
According to service data, the CCH2 heater voltage should be 20 Volts which was
close to the measured. A couple of online datasheets, however, stated 29 Volts.
When I measured the heater voltages initially, I just took the CCH2 since it was
fairly easy to access and the 20V seemed right. The rest of the valves heaters had
to be correct too since this is a series chain, or at least I assumed that.
I then measured around a bit and found all the heater voltages to be low.
The un-original dropper resistor is of the adjustable type, a small screw losens
a bracket that slides up and down the resistor to set its resistance, and it was
then set to match the datasheet heater voltages exactly. Powering up again left me with a few more stations and just slightly higher volume.
Still not quite home. Back to the frontend valve.
Unable to find an unused CCH2, I was adviced to try mounting an ECH3.
The function of the ECH3 is very close to that of the CCH2.
Most functions and specs are the same, even the pinout is an exact match, only
the heater voltage is different.
The heater current, fortunately, is the same which makes life much easier when dealing
with a set with a series heater chain.
The CCH2 heater took 29 Volts, the ECH3 only 6,3 Volts so the dropper would have to
be changed to suit this new situation.
Since this is, at least for now, a temporary setup, I didn't want to mess up the
freshly adjusted dropper resistor but instead calculate a second dropper to add to
the series chain.
Ohms law in action; We have to drop (29-6,3) = 22,7 Volts.
With a heater current of 200mA, the resistor calculates to (22,7/0,2) = 113 Ohms
The power handling of the resistor should be no less than (22,7x0,2) = 4,5 Watts Two 5W resistors were paralleled to give the desired resistance and adequate power
handling and a brand new ECH3 was fitted. Warming up the set again - this time with the voltmeter across the ECH3
heater, looking fine. The set came to life and this time with a decent output volume.
Stronger stations are now loud enough for me to want to bring the volume down a bit
but the AGC is still not doing anything - or at least very little in that it
works from -0,3 Volts to apprx -0,4 volts and that according to the tuned frequency
rather than the signal strength of the tuned stations.
Obviously, there's still something to do but it did confirm that none of the CCH2
valves are very good and the ECH3 may well end up a permanent solution with the
dropper resistor value set according to this situation. If it was twice as easy, it wouldn't be half the fun.  Martin
|
|
-
-
Craig

- Joined on 03-29-2007
- Costa Del St Evenage
- Posts 4,855
|
Martin, I truly admire you patience with this. So I take it your own Beolit 39 is in a non working state then? Craig
For millions of years, mankind lived just like the animals. Then
something happened which unleashed the power of our imagination. We
learned to talk and we learned to listen..
|
|
-
-
PWH
- Joined on 06-22-2008
- Posts 44
|
Nearly there- Check the AGC line for resistors gone high- they usually do and leaky capacitors - even a tiny leak may kill the AGC - I haven't got the circuit so can't be sure, but if its the original capacitor it will probably need changing.(Temporarily swap the components for new ones) Occasionally the low value caps go O/C so its worth testing for that too Good luck
|
|
-
-
Dillen
- Joined on 02-14-2007
- Copenhagen / Denmark
- Posts 5,008
|
Thanks for the comments and suggestions. The AGC components seem fine though I will be replacing the
related capacitor regardless.
Still, a constant low AGC line should only keep the amplification high
so I doubt an AGC fault in this case.
It will of course be checked and the IF alignment will be up next. I will have
to make up a tool to trim the coil core. It's a hex nut sitting far down the long
coil former and any metal objects in there would only disturb the setting so the tool
will have to be plastic, wood or some other non-metallic material. Martin
|
|
-
-
Dillen
- Joined on 02-14-2007
- Copenhagen / Denmark
- Posts 5,008
|
Again, it has been some time. Work on the Beolit 39 project has progressed only
slowly but has not in any way halted.
It turns out, I live in an area with only limited AM reception.
Geographically I find myself in a valley ontop a hill, not the best position
since AM generally is greatly directional.
However, with a fairly long outdoor antenna (apprx 20 meters) and a good grounding
(central heating radiator), a good grounding is essential, I managed
to pick up more stations and the volume was much better though the AGC
line still didn't do much.
Time to start transmitting a reference signal.
I have an AM radio transmitter that I programmed to a frequency in the
middle of the MW band where no other stations could be heard.
A wavelength of 400m calculates to apprx 750KHz and the transmitter was
powered up, fed a music signal from a CD and using just apprx 3m of wire
as antenna.
The Beolit was then warmed up and tuned across the MW band. Lots of stations but
suddenly a loud burst from the new local station.
A cloud of dust was emitted from the speaker as I flew towards the volume control.
Now the AGC line did something and the volume was certainly NOT lacking anything !
A little tweaking of the IF coils to peak the signal and a little more testing
reveals the Beolit to be in fine working condition indeed.
The problems I had, turned out to be nothing more than me living in the wrong place.
The radio played Glenn Miller's greatest hits happily for about an hour.
This about concludes electronic repairs to the chassis.
Martin
|
|
-
-
-
Dillen
- Joined on 02-14-2007
- Copenhagen / Denmark
- Posts 5,008
|
So true, Jeff.
This is about as lucky as one can get, and still not quite home and dry.
Explanation follows but first take a look at what I've found;

Martin
|
|
-
-
Dillen
- Joined on 02-14-2007
- Copenhagen / Denmark
- Posts 5,008
|
The dial lamp in the photo is a NOS (New Old Stock) dial lamp originally produced for
the Master DeLuxe 39K as can be seen on the white printing on the glass
envelope.
Obviously, the lamp is of the same family as the Beolit 39/40 lamp but not quite identical
in that the interconnects are different to match the Master Deluxe's two series of
valve heaters rather than the Beolit's one.
The interconnects could be converted to match this lamp by rearranging the leads
to the lamp socket but the filament voltage is far from correct, making this lamp
unuseable for the job.
So close and yet so far...

Martin
|
|
-
-
Craig
- Joined on 03-29-2007
- Costa Del St Evenage
- Posts 4,855
|
Martin, it is great to hear you at the end of this restoration.
Craig
For millions of years, mankind lived just like the animals. Then
something happened which unleashed the power of our imagination. We
learned to talk and we learned to listen..
|
|
-
-
-
Dillen
- Joined on 02-14-2007
- Copenhagen / Denmark
- Posts 5,008
|
I really would like to get rid of the large ceramic resistor but with no
original dial lamp in sight, an alternative to the large ceramic resistor
and the heat it produces would have to be found.
The large resistor looks completely out of place, it emits a lot
of heat, surface temperature measured in at apprx 160deg C using an
IR thermometer, and I would like to have some light on the dial, also because
this will be the only way to tell if the set is powered on.
So I would have to find a suitable lamp. Luckily, the lamps voltage should be in
the 115-120 Volt range and at the series current of 200mA the wattage should
be around 25W. I should be able to drop any excess voltage in a much
smaller resistor and heat will no longer be an issue.
A bunch of 120V 25W halogen bulbs were found at Ebay, they arrived and I started
experimenting a little;
Whatever the solution turns out to be, I want it to be fully reversible in case
a proper dial lamp should turn up.
The first solution I thought of included the use of a 120V 25W halogen lamp
as series resistor. It has the correct resistance and voltage to do the job
but only when the circuit has warmed up and the current has become steady.
The problem with this solution was that with cold valves, the initial drop
voltage is around 190 Volts, only dropping to around 120 V after about
30-40 seconds. The halogen lamp will not live very long under these conditions
and the light emitted at even the nominal 120 Volts would be way too sharp and bright.
A second solution involving two lamps in series proved much better and it has more
pros in that it keeps the heat down and allows for a slightly better light distribution.
However, a new issue came up in the form of the resistance no longer being correct and
a suitable bypass resistor had to be calculated.
This resistor would be nothing like the large ceramic one and with most of the
power emitted as light from the two lamps, the power emitted by the resistor
as heat calculated to less than 7 Watts. Absolutely tolerable.
The solution I came up with can be seen here. It may look a bit cruel but it has
been made using only existing holes in the chassis metal structure and is fully
reversible in that it bolts off completely in 30 seconds and a correct dial lamp
can be plugged right into the original lamp socket.
The lamps are giving out a pleasant warm glow and the three combined resistors
doesn't get more than hand-warm so the heat problem has been solved and I now
have dial light allowing me, for the first time, to actually tell if the
chassis is powered without checking for glowing valve heaters.
Martin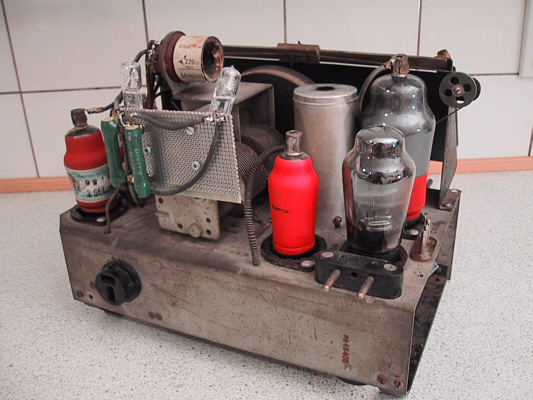
|
|
-
-
j0hnbarker
  - Joined on 04-16-2007
- LS28/GB
- Posts 2,002

|
Keep going Martin :)
I really like the way you're so committed to making your changes reversible, should the appropriate parts turn up somehow.
Best of luck with it!
President, Beomaster 8000 Appreciation Society
|
|
-
-
-
Dillen
- Joined on 02-14-2007
- Copenhagen / Denmark
- Posts 5,008
|
Indeed, just like that extra hole drilled in the chassis to hold the large
ceramic resistor is but there's nothing to do about it, it's now part of this
radios history.
Now, take a look at what arrived from my very good friend in Germany :
Martin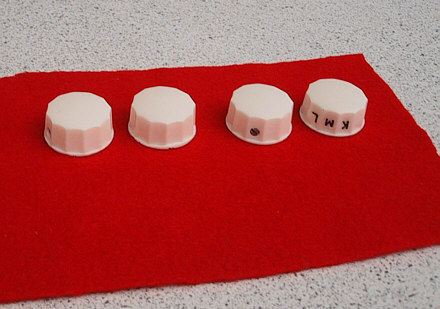
|
|
-
-
Dillen
- Joined on 02-14-2007
- Copenhagen / Denmark
- Posts 5,008
|
The new knobs are wonderful and perfect for the job. I couldn't have wished
for a better solution.
While soak testing, I noticed an increasing hum from the speaker. Slowly
growing in amplitude and eventually enough to be quite annoying.
A replacement CY2 rectifier valve was fitted which solved the problem.
The CY2 was the only original valve left in the radio though I suppose it
wasn't actually original in the first place in that the chassis and service sheet
calls for a CY1.
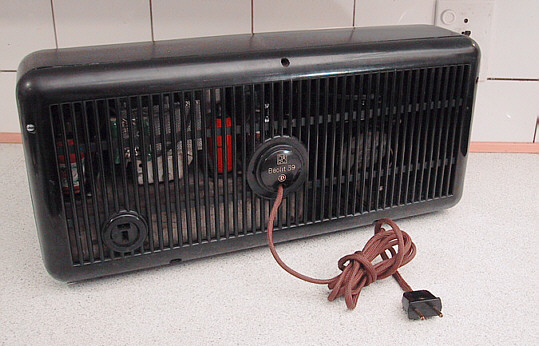
No further problems were noted so the Beolit was put together.
Powering up for the first time inside the bakelite cabinet had a lot of light
coming out the rear grille as predicted but no light reached the dial.
Out with the chassis again and an investigation of the inner surfaces of
the cabinet revealed a tiny amount of glue remains to the underside of the
top surface above the chassis and lamp.
I suppose a piece of alu-foil or similar was once mounted here so I reproduced
this and added a little to the inside of the rounded top edge of the rear cover
as well.
This brought a little light on the dial and also gives a little heat reflection
to keep the top surface of the radio cooler.
Actually, after playing for 2 hours, the radio is just handwarm in 2 areas,
namely above the dial lamp(s) and above the output valve.
Along with the light amount of the dial, these warm spots should be
considered normal.
At some point during the whole process, the owner was contacted by
someone who has a NOS dial for sale.
This would be a very rare sparepart and I understand that the radios owner
found it to be quite costly but I believe he is still considering the offer.
Martin
|
|
|
|
|