|
Untitled Page
ARCHIVED FORUM -- April 2007 to March 2012
READ ONLY FORUM
This is the first Archived Forum which was active between 17th April 2007 and
1st March February 2012
Latest post 10-25-2009 10:03 PM by MAKEDONIA. 141 replies.
-
 08-27-2008 3:50 PM
|
|
-
 Dillen
  - Joined on 02-14-2007
- Copenhagen / Denmark
- Posts 5,008

|
In between the somewhat trivial, though never boring, Beogram tangential overhauls
and Beomaster 5000 idle current repairs, just once in a while something a little
more exciting is brought to me for repairs.
Like a couple of weeks ago when a proud owner brought in this little beauty.
Neatly wrapped in several soft towels and put in a strong box with carrying handles,
it was definitely being taken good care of.
The owner wanted me to take a look at it and see if I could make it work again.
This will be the main target though I also would like to make the radio safe to
use on a daily basis.
This thread will, as the work progresses and as time allows, be updated to follow
the repairs. Your questions, comments etc. will be greatly appreciated.
Martin
|
|
-
-
-
Craig

 - Joined on 03-29-2007
- Costa Del St Evenage
- Posts 4,855
|
Very nice Martin, how many of these have you worked on? Not a lot I would think. Craig
For millions of years, mankind lived just like the animals. Then
something happened which unleashed the power of our imagination. We
learned to talk and we learned to listen..
|
|
-
-
-
Dillen
- Joined on 02-14-2007
- Copenhagen / Denmark
- Posts 5,008
|
This is, if my memory serves me right, only the third set of this type on my bench, for
sure not the type, I see the most. First one was many years ago, probably a
minor repair, then my own and now this one.
The full story of the Beolit 39 is widely known and can be found countless places on
the net, so I won't go into much more details here other than mentioning that
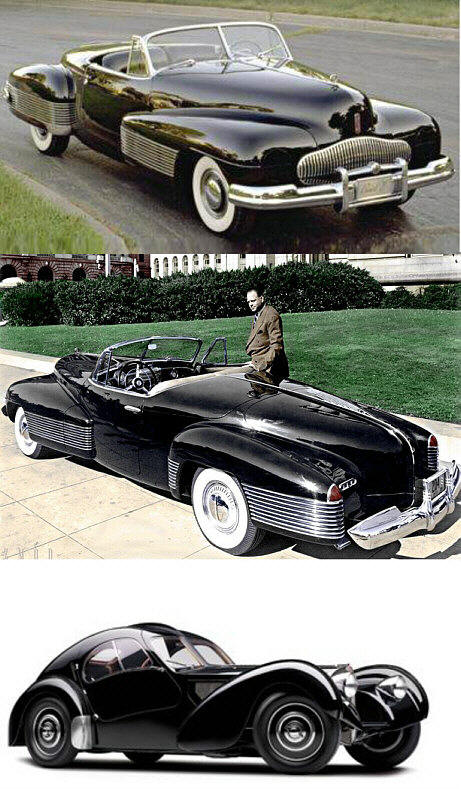
the 1938 Buick Y-Job concept car and the 1938 Bugatti Type 57SC Atlantic Coupe were
both obvious sources of inspiration to what was definitely a striking and
ground-breaking radio design.
The history of the Buick Y-job and Harley Earl, pictured here together with
one of the many cars he designed, is easily worth a couple of minutes so please
read here but as you read along don't forget that this car with all it's
features etc. was created a couple of years prior to WW2 (!).
http://www.prewarbuick.com/features/why_the_y_job
- and don't forget to come back here.
Martin
|
|
-
-
beocool
 - Joined on 10-17-2007
- the Netherlands
- Posts 5,514

|
It's beautiful. I really would like to own one of those....
Beoworld's twenty-eighth ninth prize winner and fifty-first second prize winner. Best £30 I've ever spent!
|
|
-
-
j0hnbarker
  - Joined on 04-16-2007
- LS28/GB
- Posts 2,002

|
Great stuff Martin - reminiscent of the thread you posted about my Jet Present 607 last year! I don't suppose this one's for sale though :( Lucky owner ;)
President, Beomaster 8000 Appreciation Society
|
|
-
-
Friedmett
 
- Joined on 04-28-2007
- Herning, Denmark
- Posts 840

|
One of my favorite old B&O radios that I would love to have some day. Martin is properly going to do that one as well if I mangage to find one. Looking forward to see more of Dillen's work in pictures! Has my stuff been a little less interesting to do so far?
|
|
-
-
Dillen
- Joined on 02-14-2007
- Copenhagen / Denmark
- Posts 5,008
|
John, No, I'm afraid this one is not mine to sell. 
Friedmett, Not at all ! Every succesful repair is a plus. Servicing the older B&O things gives a pleasure that is hard to describe. One more B&O repaired is one more B&O saved and the things deserve it. However, when you have seen the same fault ten times it hardly comes as a surprise anylonger and it tends to put a slight limit to the excitement. 
Thanks for all the comments, I haven't even started the repair yet and at this
point, noone knows if it will ever be completed.
The condition and history of this radio is unknown so when handed a set for repair,
like this one, I will have to check out everything. Noone knows what was done to it
through its 70 years.
- what parts have been replaced if any
- is parts missing or in the wrong places,
- it may even have wrong parts mounted !
If a repair has been previously attempted, which it probably has in this case, why
didn't the repairer succeed ? Maybe something caused the repairer to simply give up.
There are so many things to check before applying power for the first time but let's
first take a look at what we actually have here;
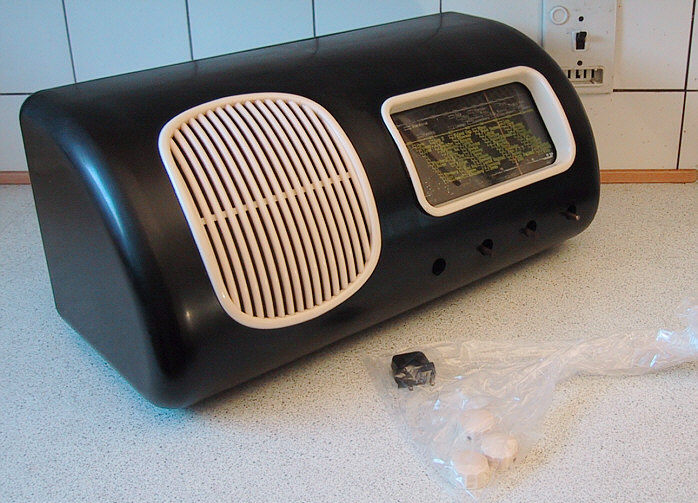
The Beolit 39 is a 4-valve AC/DC, AM only set, built in late 1938 and launched
just in time for the christmas 1938 shopping frenzy.
Being an AC/DC set will allow it to work from both AC (Alternating Current) and
DC (Direct Current) mains. This is quite normal for radios of it's time since both
forms of mains were widely used at the time, some even used high-voltage batteries
which would also work fine with the Beolit 39.
There are four knobs on the front, they are from left to right:
1,Power switch (push/pull) and volume
2,Tone control
3,Band selector
4,Tuning
The band selector will select between long wave, medium wave and short wave.
FM was first introduced in Denmark in the mid-50's so there's no provision for
an FM upgrade in this set.
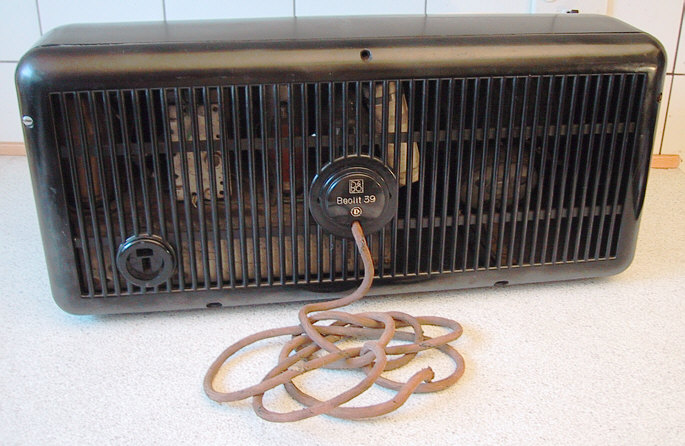
At the back of the radio, the antenna connector and the mains cord plug are the only things.
No extra inputs or outputs are available, suggesting that this radio was to be
used in a secondary room, f.e. a bedroom, rather than the main living-room where
an eventual grammophone or extra speaker would be the likelier options.
The valve line-up is nothing special though using only four valves in this fairly
restricted room provided by this newly designed cabinet, had the engineers work hard.
The volume- and tonecontrol circuits are actually quite comprehensive compared
to contemporary radios from other manufacturers.
The rest of the radio's circuits are pretty much basic.
Valve line-up:
CCH2 tuner front-end,
EF5 (or EF6) RF/IF/AF amplifier,
CBL1 output amplifier and
CY1 rectifier.
Martin
|
|
-
-
j0hnbarker
- Joined on 04-16-2007
- LS28/GB
- Posts 2,002
|
Really interesting Martin - looking forward to reading more about this wonderful set :)
President, Beomaster 8000 Appreciation Society
|
|
-
-
Dillen
- Joined on 02-14-2007
- Copenhagen / Denmark
- Posts 5,008
|
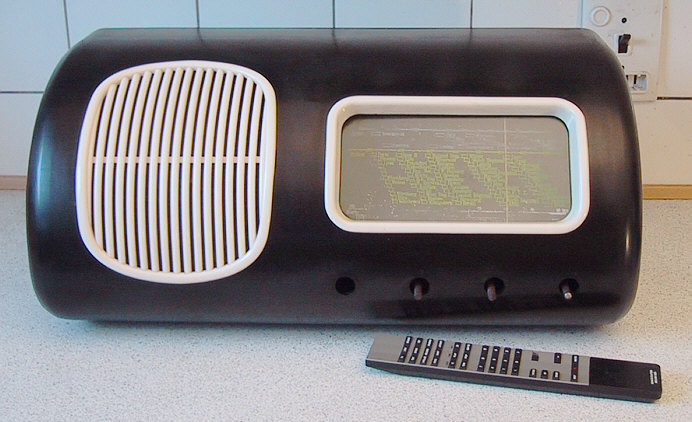
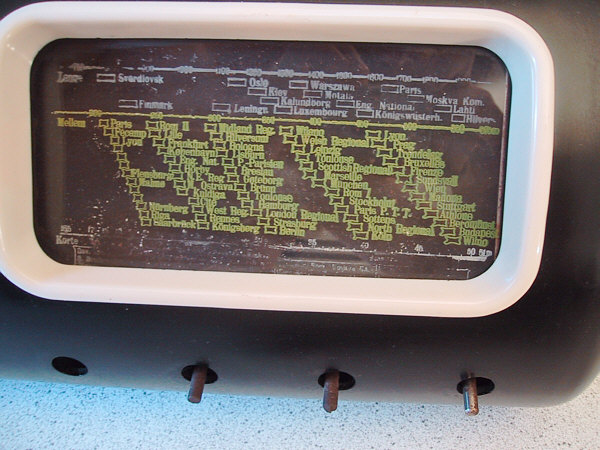
Is it that big ?
One thing that seems to strike everybody is the sheer size of the radio.
Its 24cm height, 25cm depth and full 52cm width surprises most people who only
ever saw it in photos and figured it something the size of a bread-box.
This photo shows the Beolit 39 (chassis no 45403) together with a Beolink 1000
remote control for size reference.
Martin
|
|
-
-
Dillen
- Joined on 02-14-2007
- Copenhagen / Denmark
- Posts 5,008
|
Assessing repairs to a radio like this, there's always good and bad things.
Let's start with what is obvious;
The good things are that the cabinet parts, the speaker grill and dial frame
are all intact and in extremely good condition.
The speaker grill and dial frame are often found cracked or chipped on
this model but not here.
The radio is missing its four knobs but three of them were included in a bag
that also contains a correct bakelite mains plug and a dual-tube of Araldite.
The owner noticed that the knobs were cast largely hollow and he was afraid that
the remaining knobs would crack so he suggested I fill up the knobs cavities
with araldite. This is not a bad idea and I've done this to previous
repairs as well.
So, what we can see through the rear vent grill is that the chassis
inside looks pretty much OK, so we have an almost complete set to start with.
The bad things are that the lettering on the dial has more or less gone and what's
left is almost unreadable, this is something that will have to be solved somehow.
A closer look reveals that not only is the volume knob missing - the potentiometer
spindle on which its supposed to sit is also missing.
This is not a catastrophy, a replacement potentiometer will have to be found,
though finding one with the correct push-pull mains switch could prove
hard so I may be forced to compromise on the original appearance of the
innards to actually make the radio function and look as it would originally.
Martin
|
|
-
-
Dillen
- Joined on 02-14-2007
- Copenhagen / Denmark
- Posts 5,008
|
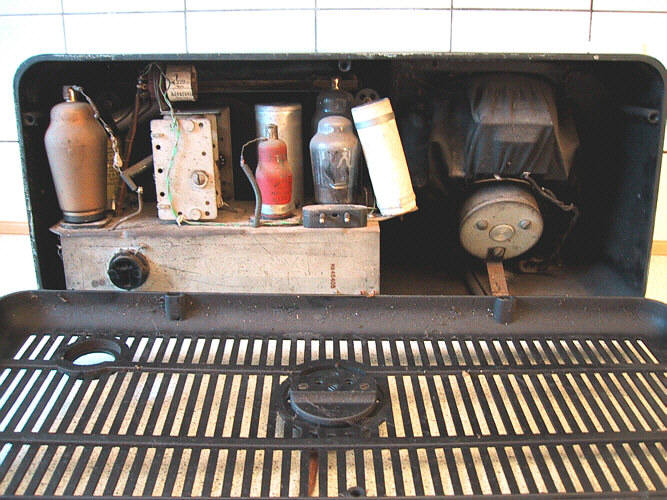
Let's take a look inside.
The rear cover is made of bakelite like the rest of the cabinet.
It's normally held by five screws but only two are present in this radio, only
one of them being original.
It's quite normal for a radio of this vintage to see the odd screw missing
so no reason to sound any alarms.
Removing the back cover also disconnects the mains power. A plug is integrated
in the rear cover.
Martin
|
|
-
-
Dillen
- Joined on 02-14-2007
- Copenhagen / Denmark
- Posts 5,008
|
The radio restorer will almost always prefer to lay hands on an untouched
radio but since the radios often have several decades of daily use on the
odometer, it's very rare to see a 70 year old radio that hasn't had service
of some kind at some point in its life.
This little beauty is no exception. A brief look on the top side of the chassis
reveals a large yellow capacitor in one corner, hidden behind a big valve.
Expecting an un-insulated aluminum can this PVC wrapped dual-cap can looks a
bit too new to me. If this is not the original cap, it's presumably in place
of the original mains smoothing and filter cap(s).
One section of the capacitor seems to have been deemed out at some point
since a smaller alu can is fitted on top, only supported by one solder tag of
the cap below. A bit of a hasty repair method. Of course, this is not a good
thing if we want to preserve the original looks.
Well, we will most likely have to replace these cap(s) anyways.
When I write cap(s) with the s in paranthesis, it's because the smoothing and
filter caps are (normally) both housed in the same aluminum can. It's like
that in most valve radios.
Another thing to notice is that the dial lamp is missing. Well, actually only
the glass envelope and innards are missing in that the lamp base is still in
place in its socket.
The Beolit 39 uses a special lamp, one of, I think, four different types unique
to only a few models of this year.
The original lamp can be rotated to set the mains working voltage of the radio.
Clever detail at the time but quite annoying now if a fresh lamp
cannot be found, which unfortunately is highly likely to be the case.

Martin
|
|
-
-
Craig
- Joined on 03-29-2007
- Costa Del St Evenage
- Posts 4,855
|
Very interesting thread Martin. Thank you for taking the time to post all these pictures. Craig
For millions of years, mankind lived just like the animals. Then
something happened which unleashed the power of our imagination. We
learned to talk and we learned to listen..
|
|
-
-
-
Medogsfat

- Joined on 02-21-2007
- *Moderator* Leeds, Yorkshire
- Posts 4,045
|
 francoisvl: francoisvl: If I opened this radio, I would close it immediately!!
Me too!
But boy oh boy wouldn't I just love to own one
Really looking forward to this thread Martin.
Chris.
The use of metaphors should be avoided like the plague. They're like a red rag to a bull to me.
|
|
-
-
Mohawk
  - Joined on 01-30-2008
- Sweden
- Posts 103
|
Great thread Martin!!! It's interesting to see the how the work progress in this thread. Keep it up!!! /Fredrik
|
|
-
-
Jandyt

- Joined on 04-01-2007
- Clitheroe, Lancashire, UK
- Posts 13,004
|
Brilliant thread Martin! Clever idea to have the mains plug integrated with the rear cover. Stops you accidentally meddling with a live wireless. I wonder if the bulb exists in a non B&O environment, or was made specifically for this Beolit.
|
|
-
-
-
Dillen
- Joined on 02-14-2007
- Copenhagen / Denmark
- Posts 5,008
|
Thanks guys.
Francoisvl wrote and Chris agreed:
I am totally spellbound! If I opened this radio, I would close it immediately!!
- You have my deepest respect for this. Actually, this is what most vintage radio
restorers would prefer of the radios owners.
Andy wrote:
I wonder if the bulb exists in a non B&O environment, or was made specifically for this Beolit.
- I recall seeing the B&O logo and the lettering "Beolit 39/40" on a lamp so I'm pretty sure that it's unique to this model.
Worth noting that the dial lamp is not lighting the dial in particular.
Sitting where it does, directly on top of the chassis, it will simply light up
the whole radio inside and some of the light just happens to reach the dial.
A good portion of the light will, through the rear grille, light up the wall behind
the radio  so any replacement lamp will do the job just as good, really. so any replacement lamp will do the job just as good, really.
If an original lamp cannot be found, I will have to figure out the voltage and wattage needed.
This is not as hard as it may sound. The lamp is in series with the valve heaters,
directly working on mains so the ampere rating will be the same (200mA in this
case).
The lamps voltage will have to be calculated; Take the mains voltage and subtract
the 4 valves heater voltages since the lamp will have to "use up the remaining voltage".
But we will deal with this later, if needed, and look a bit further on the chassis;
A fairly large ceramic resistor seems to have been added at some point, it's leads
beeing of the thin PVC covered type of massive one-core mounting lead that is used
heavily in 1960, 70 and 80's sets. These leads, being green/grey, along with the
resistor itself, look out of place in this radio. My initial thought
when I saw this was that it's job was to replace the missing dial lamp, coupled in
series with the valve heaters, supplying some sort of voltage to the rest of the
set now that the dial lamp is no longer doing so.
The speaker leads has been cut, but the plug used for connecting to the socket on
the chassis was found inside, thanks to whoever kept it there !
Another object can be heard, rattling around inside, sounds metallic and I'm
excited to see what it is.
There are also good news in that it seems all valves are in their correct places
though their condition is yet unknown and the rectifier has it's glass envelope
lose from it's base but generally it seems there are no major parts missing.
The EF9 and CY2 fitted in this particular set must be from previous
repair(s) and shouldn't be cause for concern in that they are fine substitutes
for the original types, at least for now.
The chassis will have to come out now so we can take a look below decks and
a closer look on top.
Martin
|
|
-
-
rayfenwick
 
- Joined on 04-28-2007
- Hull UK (again)
- Posts 693
|
As everyone else says, thanks for sharing this. It is fascinating, and of course I want one too! :)
Ray
Я люблю Банг и Oлуфсен
|
|
-
-
Dillen
- Joined on 02-14-2007
- Copenhagen / Denmark
- Posts 5,008
|
The chassis is normally held in place by four screws with hex-heads encapsulated in bakelite.
Remember that this is an AC/DC universal radio with no mains transformer so the
chassis and any metal parts in direct contact with it, can potentially be the
bearer of live mains. There's a good chance that touching anything metal on the radio
will kill you, often the radio doesn't even have to be switched on. Safety first !
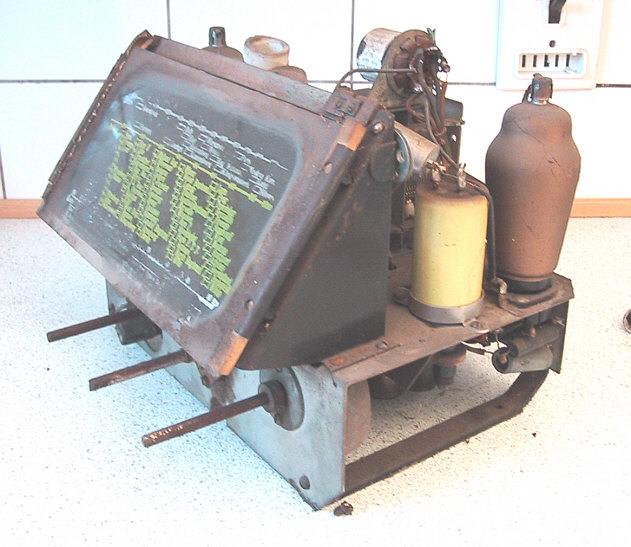
The chassis comes out as one complete assembly and everything is then fairly
easy to access.
It will stand perfectly by itself for access to the things on top and it will rest
on the metal rails at each end of the dial, dial face down, without the dial glass
actually touching the table surface, for access to the things below decks.
Martin
|
|
-
-
Dillen
- Joined on 02-14-2007
- Copenhagen / Denmark
- Posts 5,008
|
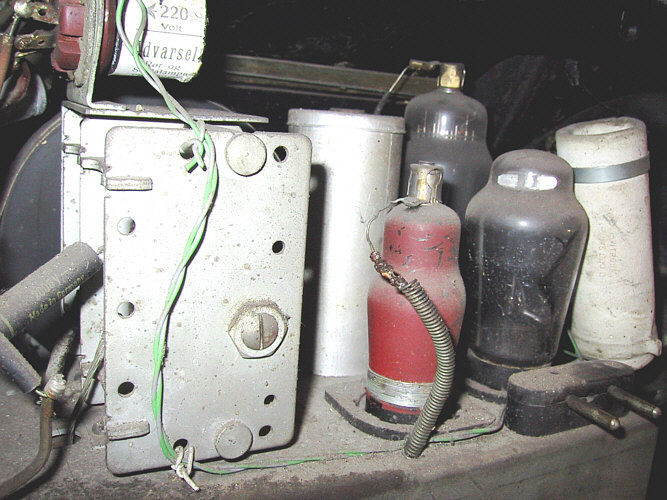
If you solely work with 70's and newer radios, you probably won't be familiar with
many of the components in a 30's set so let's take a brief look at some of the
major components, where they are and what they do;
A, CCH2 Valve, mixer-hexode. RF amplifier, mixer, oscillator or just "Tuner front-end".
B, EF5 Valve, (in this set EF9) HF Pentode. "IF amplifier".
C, CY1 Valve, (in this set CY2) Diode. "Mains rectifier".
D, CBL1 Valve, Double Diode Output pentode. AF amplifier or "Output stage".
E, Mains smoothing and filter cap(s), this photo clearly shows the added capacitor
and it's dangerous mounting. It is very close to the metal dial frame.
F, Tuning capacitor, rotated using the tuning knob via the large wheel behind the
dial to set the tuning frequency.
G, The remains of the dial lamp. Only the lamps base is still present.
H, IF can. Contains tuned circuits to set the IF amplifiers (EF5) dedicated frequency range.
Just to the right of C, the added ceramic resistor.
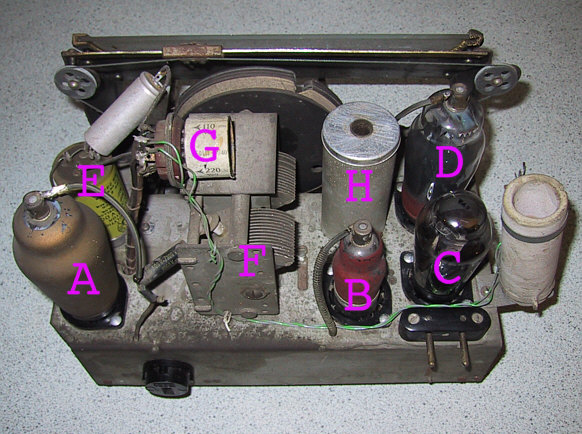
Martin
|
|
-
-
Friedmett
- Joined on 04-28-2007
- Herning, Denmark
- Posts 840
|
Looks great and old. What are the 2 pins sticking out on the right bottom side? Will you remove the added bits to keep it more original or will it be best to still keep it in?
|
|
|
|
|